No Bake Oreo Nutella Cheesecake – Easy Dessert

No Bake Oreo Nutella Cheesecake is a dream come true for any dessert lover, and trust me, once you try it, you’ll understand why. This isn’t just any cheesecake; it’s a symphony of textures and flavors that dance on your palate. Imagin extracte a rich, creamy filling swirled with that irresistible hazelnut chocolate goodness of Nutella, all nestled on a crunchy Oreo crust. What makes this No Bake Oreo Nutella Cheesecake so special? For starters, the convenience is a huge win. No oven required means less fuss and more time to enjoy the decadence. It’s the perfect solution when you’re craving something utterly indulgent but don’t want the commitment of baking. It’s a crowd-pleaser, a guaranteed hit at parties, or just a fantastic way to treat yourself after a long week. The combination of dark chocolate cookies and smooth Nutella is simply magical!

No Bake Oreo Nutella Cheesecake

No Bake Oreo Nutella Cheesecake

Oh, this No Bake Oreo Nutella Cheesecake is a dream come true for any dessert lover! It’s incredibly decadent, rich, and perfectly balances the creamy sweetness of cheesecake with the irresistible flavors of Oreo cookies and Nutella. The best part? You don’t even need to turn on your oven. This makes it a fantastic option for those hot summer days or when you’re just craving a quick, show-stopping dessert without the fuss of baking. I love how the crunchy Oreo crust gives way to the smooth, velvety cheesecake filling, all topped off with a swirl of luscious Nutella. It’s a guaranteed crowd-pleaser, and honestly, I often find myself sneaking a slice (or two!) when no one’s looking. Let’s get started on creating this masterpiece!

Ingredients:

  • 200g crushed Oreos (for the crust)
  • 50g melted butter (for the crust)
  • 500g cream cheese, softened (full-fat for the best texture)
  • 200g Nutella (for the filling)
  • 200g heavy whipping cream (35% fat content is ideal for whipping)
  • 50g sugar (adjust to your sweetness preference if desired)
  • 100g chopped Oreos (for the filling and topping)
  • 100g Nutella (for layering within the filling)
  • 100g Nutella, warmed for drizzling (ensure it’s pourable)
  • 5 crushed Oreos (no filling, for the final dusting)
  • 6 whole Oreos for garnish
  • Creating the Oreo Crust

    The foundation of any great cheesecake is its crust, and this one is no exception. We’re starting with a simple yet incredibly flavorful Oreo crust that’s both easy to make and provides the perfect textural contrast to the creamy filling.

  • First things first, let’s get our Oreos crushed. You can do this by placing them in a zip-top bag and crushing them with a rolling pin, or for a finer crum extractb, a food processor is your best friend. Make sure there are no large chunks remaining; we’re aiming for a fine, sand-like consistency. Once you have your 200g of crushed Oreos ready, transfer them to a medium bowl.
  • Next, melt your butter. You can do this in the microwave in 20-second intervals or in a small saucepan over low heat. Once melted and smooth, pour the 50g of melted butter over the crushed Oreos.
  • Now, stir everything together until the cookie crum extractbs are thoroughly coated with the butter. The mixture should resemble wet sand and hold its shape when squeezed. This is crucial for a crust that won’t crum extractble apart.
  • Take your springform pan (an 8 or 9-inch pan works wonderfully). Pour the Oreo and butter mixture into the bottom of the pan. Using the back of a spoon or the flat bottom of a glass, firmly press the crum extractbs evenly across the bottom of the pan. You want to create a solid, compact layer. For an extra professional touch, you can press some of the mixture up the sides of the pan as well to create a slight rim. Pop this into the refrigerator for at least 15-20 minutes while you prepare the filling. This chilling step helps the crust set and firm up beautifully.
  • Whipping Up the Dreamy Cheesecake Filling

    This is where the magic happens! We’re going to create a luscious, rich, and utterly divine cheesecake filling that’s studded with more delicious Oreo bits and swirled with Nutella.

  • In a large mixing bowl, ensure your 500g of cream cheese is truly softened. This means it should be at room temperature and yield easily to the touch. If it’s still a bit firm, you can gently warm it by leaving it out on the counter for a bit longer or by briefly microwaving it in 10-second bursts, being careful not to cook it. This will prevent lumps and ensure a silky-smooth filling. Add the softened cream cheese to your mixing bowl.
  • Now, it’s time to add the Nutella to the cream cheese. Spoon in the 200g of Nutella. Using an electric mixer (handheld or stand mixer), beat the cream cheese and Nutella together on medium speed until they are completely combined and the mixture is smooth and creamy. Scrape down the sides of the bowl as needed to ensure everything is incorporated. You want a uniform, luscious brown color at this stage.
  • In a separate, clean bowl, add the 200g of heavy whipping cream. Begin extract whipping the cream on medium-high speed. As it starts to thicken, gradually add the 50g of sugar. Continue whipping until stiff peaks form. Stiff peaks mean that when you lift the whisk or beaters, the cream stands up straight and doesn’t curl over. Be careful not to over-whip, or you’ll end up with butter!
  • Gently fold the whipped cream into the Nutella and cream cheese mixture. Do this in two or three additions. Use a spatula and a folding motion, incorporating the whipped cream without deflating it. You want to maintain that airy texture. Once the whipped cream is fully incorporated, your cheesecake filling will be wonderfully light and creamy.
  • Now, it’s time to add those delightful chopped Oreos to the filling. Gently fold in the 100g of chopped Oreos. You want to distribute them evenly throughout the batter. And for that extra layer of Nutella goodness, add the 100g of Nutella to the mixture. Using your spatula, swirl the Nutella into the cheesecake filling. Don’t overmix; you want distinct swirls of Nutella throughout the creamy base. This will create beautiful pockets of intense Nutella flavor.
  • Assembling and Chilling Your Masterpiece

    The assembly is the final, exciting step before we let time do its magic.
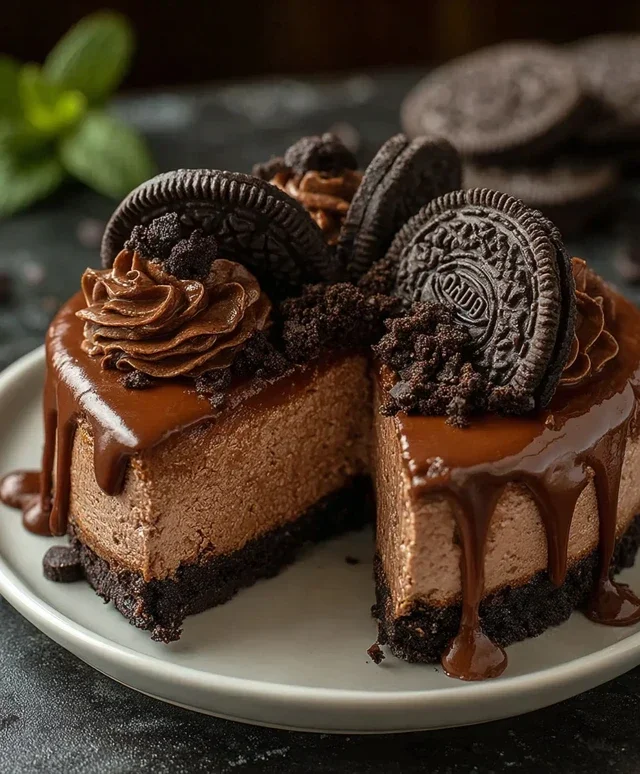
  • Retrieve your chilled Oreo crust from the refrigerator. Carefully spoon the delicious cheesecake filling over the crust, spreading it evenly with your spatula. Make sure to get all the nooks and crannies filled.
  • Now, for the crowning glory! Take the 100g of warmed Nutella and drizzle it generously over the top of the cheesecake. You can use a spoon or a piping bag for more controlled swirls. Then, take your spatula or a toothpick and gently swirl the drizzled Nutella into the surface of the cheesecake. This creates a beautiful marbled effect and adds another dimension of Nutella flavor.
  • For a final touch of texture and flavor, sprinkle the 5 crushed Oreos (no filling) over the top of the swirled Nutella. This adds a delightful crunch and a more intense Oreo flavor. Finally, arrange the 6 whole Oreos artfully on top for decoration.
  • Cover the cheesecake loosely with plastic wrap or foil. Transfer the cheesecake to the refrigerator and let it chill for at least 6 hours, or preferably overnight. This chilling time is absolutely essential for the cheesecake to set properly and for all the flavors to meld together beautifully. The longer it chills, the firmer and more delicious it will be!
  • Once the cheesecake is thoroughly chilled and set, carefully run a knife around the edge of the pan to loosen it. Then, release the sides of the springform pan. Slice and serve your incredible No Bake Oreo Nutella Cheesecake. It’s best served chilled and can be stored in the refrigerator for up to 3-4 days. Enjoy every single decadent bite!
  • No Bake Oreo Nutella Cheesecake

    Conclusion:

    So there you have it! This No Bake Oreo Nutella Cheesecake is an absolute showstopper, and the best part? It’s incredibly easy to make. You get that irresistible combination of creamy cheesecake, crunchy Oreo crust, and decadent Nutella – all without even turning on the oven. It’s the perfect dessert for when you want something impressive without the stress, making it ideal for busy weeknights or impromptu gatherings. I’m confident you’ll love how rich and satisfying this no-bake delight is!

    For serving, a simple dusting of cocoa powder or a few extra Oreo crum extractbles elevate it even further. You could also drizzle on a little extra Nutella or some melted dark chocolate. If you’re feeling adventurous with variations, consider adding a swirl of raspberry jam for a delightful tartness, or even some mini chocolate chips to the filling for extra texture. Don’t be afraid to experiment and make this No Bake Oreo Nutella Cheesecake your own! I truly encourage you to give this recipe a try; you won’t be disappointed!

    Frequently Asked Questions:

    Can I make this cheesecake ahead of time?

    Absolutely! This cheesecake is perfect for making ahead. In fact, it’s best when it has at least 4-6 hours (or even overnight) in the refrigerator to allow the flavors to meld and the cheesecake to set properly. This makes it an ideal dessert to prepare the day before a party.

    What can I substitute for Nutella if I don’t have any?

    If you’re out of Nutella or prefer a different flavor, you have a few excellent options. You could use another hazelnut spread, a good quality chocolate hazelnut spread, or even a smooth peanut butter for a different but equally delicious flavor profile. A thick chocolate ganache could also work if you’re looking for a pure chocolate hit.

    How long will this cheesecake last in the refrigerator?

    This No Bake Oreo Nutella Cheesecake will stay fresh in an airtight container in the refrigerator for up to 3-4 days. The crust might soften slightly over time, but the flavor will remain wonderful!


    No Bake Oreo Nutella Cheesecake

    No Bake Oreo Nutella Cheesecake

    A decadent no-bake cheesecake featuring a crushed Oreo base and a creamy Nutella filling, topped with more Oreos and a Nutella drizzle.

    Prep Time
    30 Minutes

    Cook Time
    0 Minutes

    Total Time
    30 Minutes

    Servings
    8 servings

    Ingredients

    • 200g crushed Oreos
    • 50g melted butter
    • 500g cream cheese, softened
    • 200g Nutella
    • 200g heavy whipping cream (35%)
    • 50g sugar
    • 100g chopped Oreos
    • 100g Nutella
    • 100g Nutella, warmed for drizzling
    • 5 crushed Oreos (no filling)
    • 6 whole Oreos for garnish

    Instructions

    1. Step 1
      Combine crushed Oreos and melted butter. Press into the base of a springform pan.
    2. Step 2
      Beat softened cream cheese until smooth. Add 200g Nutella and beat until well combined.
    3. Step 3
      In a separate bowl, whip heavy cream and sugar until stiff peaks form.
    4. Step 4
      Gently fold the whipped cream into the Nutella cream cheese mixture. Fold in chopped Oreos and 100g Nutella.
    5. Step 5
      Pour the filling over the Oreo base and smooth the top. Chill for at least 4 hours or until set.
    6. Step 6
      Before serving, drizzle with warmed Nutella and garnish with whole Oreos and crushed Oreos (no filling).

    Important Information

    Nutrition Facts (Per Serving)

    It is important to consider this information as approximate and not to use it as definitive health advice.

    Allergy Information

    Please check ingredients for potential allergens and consult a health professional if in doubt.

    Similar Posts

    Leave a Reply

    Your email address will not be published. Required fields are marked *