Easy Mini Apple Pies – Perfect Small Treats
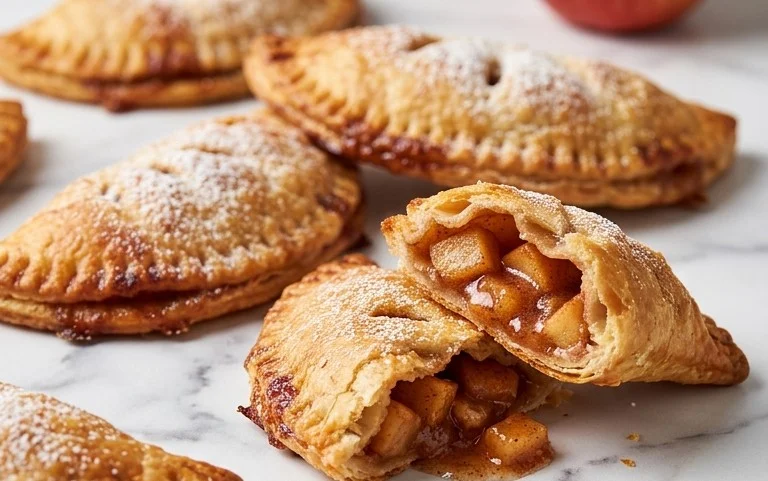
Mini Apple Pies are the adorable, bite-sized answer to all your dessert cravings! There’s something undeniably magical about these little handheld wonders. Whether it’s the comforting aroma of baked apples and cinnamon wafting through your kitchen or the sheer joy of biting into a perfectly flaky crust encasing sweet, tender fruit, these mini apple pies are a guaranteed crowd-pleaser. They’re perfect for parties, picnics, or simply as an irresistible treat to brighten your day. What truly sets these mini apple pies apart is their charming presentation and the fact that everyone gets their own individual slice of autumnal bliss. Forget the fuss of slicing a large pie; these delightful creations are designed for individual enjoyment, making them incredibly convenient and utterly delightful.

Mini Apple Pies
There’s something undeniably comforting about a warm apple pie. But sometimes, a whole pie feels like too much, or perhaps you just want a perfectly portioned treat to enjoy. That’s where these delightful mini apple pies come in! They’re incredibly charming, incredibly delicious, and surprisingly easy to make. Imagin extracte individual golden crusts filled with tender, spiced apples, all baked to perfection. They’re ideal for parties, a special dessert for the family, or even just a personal indulgence. This recipe uses simple ingredients you likely have on hand, making it a fantastic go-to for a quick and satisfying sweet treat.
Ingredients:
Instructions:
Preparing the Apple Filling
First things first, we need to get our apple filling ready. This is where the magic happens! Start by peeling, coring, and chopping your Granny Smith apples. Aim for bite-sized pieces, about 1/2 inch in size. Granny Smith apples are perfect for pies because they hold their shape well when baked and have a lovely tartness that balances the sweetness. In a large bowl, combine the chopped apples with the granulated sugar and light brown sugar. The brown sugar adds a lovely depth of flavor and a hint of caramel. Next, sprinkle in the ground cinnamon and ground nutmeg. These spices are classic pairings with apples and will fill your kitchen with an irresistible aroma as they bake. Finally, add the all-purpose flour to the mixture. The flour acts as a thickener, preventing your mini pies from becoming too watery. Toss everything gently to ensure the apples are evenly coated with the sugar, spice, and flour mixture. Stir in the vanilla extract for an extra layer of flavor. Set this bowl aside while you prepare the crusts.
Forming the Mini Pies
Now, let’s get these little beauties assembled. Take your two refrigerated pie crusts out of their packagin extractg. Carefully unroll them onto a lightly floured surface. We’re going to cut out circles for our mini pies. A good size to aim for is a 4-inch diameter circle. You can use a large cookie cutter, a biscuit cutter, or even the rim of a wide glass. You should be able to get about 6-8 circles from each crust, depending on how closely you place them. Don’t worry if your cuts aren’t perfect; they’re rustic and charming! You’ll also need to cut out tops for your pies. For these, you can either cut out more circles or get creative and cut out decorative shapes like leaves or small stars. If you’re making simple top crusts, you can also cut small slits in the center to allow steam to escape during baking.
Assembling and Baking the Mini Pies
With your crust circles ready, it’s time to assemble. Lightly grease a muffin tin or mini muffin tin, depending on the size of your crusts. If you don’t have a muffin tin, you can also use a baking sheet lined with parchment paper, though the muffin tin helps them hold their shape better. Place a crust circle into each muffin cup, gently pressing it down to line the bottom and sides. Spoon the prepared apple filling into each crust-lined cup. Don’t overfill them, or the filling might bubble over too much. Once your bases are filled, place the top crust circles (or shapes) over the filling. You can crimp the edges together with your fingers or a fork to seal the pies. This helps keep all that delicious filling inside! For an extra beautiful finish, in a small bowl, whisk together the egg and 1 tablespoon of water. This is your egg wash. Brush the tops of the mini pies with the egg wash. This will give them a lovely golden-brown sheen when baked. If you’re using sanding sugar, sprinkle it over the egg wash for a little sparkle and crunch.
Baking to Golden Perfection
Now, it’s time for the oven! Preheat your oven to 375 degrees Fahrenheit (190 degrees Celsius). Carefully place the muffin tin into the preheated oven. Bake the mini apple pies for approximately 20-25 minutes, or until the crusts are golden brown and the filling is bubbly. The exact baking time will depend on your oven and the size of your mini pies. Keep an eye on them towards the end of the baking time to prevent them from burning. If you notice the crusts browning too quickly, you can loosely tent them with aluminum foil. Once they’re done, carefully remove the muffin tin from the oven. Let the mini pies cool in the muffin tin for about 10-15 minutes before attempting to remove them. This allows them to set up properly.
Cooling and Enjoying
After the initial cooling in the tin, you can gently lift the mini apple pies out of the muffin cups. Transfer them to a wire rack to cool completely. While they are absolutely divine when served warm, they are also delicious at room temperature. You can enjoy them as is, or for an extra decadent treat, serve them with a scoop of vanilla ice cream or a dollop of whipped cream. These mini apple pies are perfect for any occasion, from a casual afternoon snack to a festive holiday dessert. They are best enjoyed within a day or two of baking. So gather your ingredients, get your hands a little sticky, and prepare to be delighted by these wonderfully sweet and spiced miniature marvels!
Conclusion:
I hope you’ve enjoyed learning how to make these delightful mini apple pies! These individual treats are a fantastic way to enjoy the classic comfort of apple pie in a perfectly portioned and charming package. They are relatively easy to whip up, making them ideal for both begin extractner bakers and seasoned pros looking for a quick yet impressive dessert. The flaky crust, warm spiced apple filling, and sweet aroma are simply irresistible. They’re perfect for any occasion, from a casual weeknight treat to a show-stopping addition to your next potluck or holiday gathering.
Serving these mini apple pies warm is highly recommended, perhaps with a dollop of vanilla ice cream, a drizzle of caramel sauce, or a swirl of whipped cream. For variations, consider adding a pinch of nutmeg or gin extractger to the apple filling for an extra spice kick, or incorporate a handful of chopped walnuts or pecans for added texture. You could also try using different types of apples, like Granny Smith for tartness or Honeycrisp for sweetness, to tailor the flavor to your preference. I truly encourage you to give these mini apple pies a try – you won’t be disappointed!
Frequently Asked Questions:
Can I make these mini apple pies ahead of time?
Yes, you absolutely can! You can assemble the mini apple pies and refrigerate them, unbaked, for up to 24 hours before baking. If you bake them and then let them cool completely, you can store them in an airtight container at room temperature for up to 2 days, or in the refrigerator for up to 4 days. Reheat them gently in a low oven to enjoy their best texture and flavor.
What’s the best way to prevent the bottom crust from getting soggy?
To ensure a crisp bottom crust, it’s important to pre-bake the bottom crust slightly before adding the filling. You can also brush the bottom crust with a thin layer of egg wash before adding the apples. Additionally, ensuring your apple filling isn’t too watery by cooking down the apples slightly and draining any excess liquid can also help prevent soggin extractess.
Mini Apple Pies
Individual, delightful mini apple pies with a flaky crust and a warm, spiced apple filling.
Ingredients
-
2 refrigerated pie crusts
-
3 cups chopped Granny Smith apples
-
1/4 cup granulated sugar
-
1/4 cup light brown sugar
-
1 teaspoon ground cinnamon
-
1/4 teaspoon ground nutmeg
-
2 tablespoons all-purpose flour
-
1 teaspoon vanilla extract
-
1 egg
-
1 tablespoon water
-
Sanding sugar (optional)
Instructions
-
Step 1
Preheat oven to 400°F (200°C). Lightly grease muffin tins. -
Step 2
In a large bowl, combine chopped apples, granulated sugar, brown sugar, cinnamon, nutmeg, and flour. Stir until apples are evenly coated. -
Step 3
Unroll pie crusts and cut out circles to fit into the muffin tin cups. Press the dough gently into the bottom and up the sides. -
Step 4
Divide the apple mixture evenly among the pie crusts in the muffin tin. -
Step 5
In a small bowl, whisk together the egg and water to create an egg wash. Brush the edges of the pie crusts with the egg wash. -
Step 6
If desired, sprinkle sanding sugar over the filling. -
Step 7
Bake for 20-25 minutes, or until the crust is golden brown and the filling is bubbly. -
Step 8
Let cool slightly in the muffin tin before carefully removing to a wire rack to cool completely.
Important Information
Nutrition Facts (Per Serving)
It is important to consider this information as approximate and not to use it as definitive health advice.
Allergy Information
Please check ingredients for potential allergens and consult a health professional if in doubt.