Biscoff Cookie Butter Cheesecake Pops-Sweet Treats
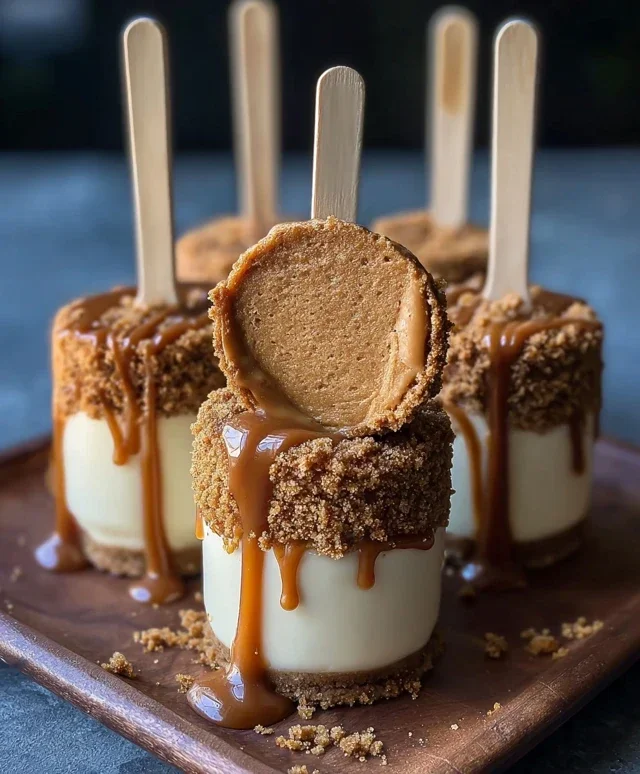
Biscoff Cookie Butter Cheesecake Pops are about to revolutionize your dessert game. If you’ve ever found yourself lost in the creamy, dreamy abyss of a cheesecake, or hopelessly addicted to the spiced sweetness of Biscoff cookies, then prepare for pure bliss. These delightful little bites are the ultimate mashup, combining the decadent richness of cheesecake with the irresistible flavor of Biscoff cookie butter. Imagin extracte a perfectly smooth, tangy cheesecake filling, swirled with that signature cinnamon-spiced goodness, all encased in a bite-sized, easy-to-handle pop. It’s the perfect party treat, a delightful afternoon pick-me-up, or just an excuse to indulge in something truly special. What makes these Biscoff Cookie Butter Cheesecake Pops so magical? It’s that unexpected, harmonious marriage of textures and tastes that’s guaranteed to have everyone asking for the recipe.
Get Ready for a Flavor Explosion!
Your New Favorite Treat Awaits.

Biscoff Cookie Butter Cheesecake Pops: A Dreamy Dessert
Get ready to fall in love with a dessert that’s as fun to eat as it is delicious to make. These Biscoff Cookie Butter Cheesecake Pops are the ultimate indulgence, combining the creamy, dreamy texture of cheesecake with the irresistible spiced caramel flavor of Biscoff cookies and cookie butter. Imagin extracte biting into a perfectly smooth, cool cheesecake filling, studded with cookie crum extractbles, all enrobed in more cookie goodness. These pops are perfect for parties, a special treat, or simply when you’re craving something extraordinary. They’re surprisingly easy to assemble, making them an approachable project for bakers of all levels.
Ingredients:
Instructions:
Step 1: Crafting the Creamy Cheesecake Base
The foundation of these delightful pops is a luscious cheesecake filling. To begin extract, ensure your 8 oz of cream cheese is properly softened. This is crucial for achieving a smooth, lump-free texture. You can leave it on the counter for about an hour or gently soften it in the microwave in 15-second bursts, being careful not to melt it. In a medium mixing bowl, combine the softened cream cheese with ½ cup of powdered sugar and 1 teaspoon of vanilla extract. Using an electric mixer (a handheld one works perfectly here), beat these ingredients together until they are incredibly smooth and creamy. Scrape down the sides of the bowl a few times to make sure everything is fully incorporated and there are no pockets of unsweetened cream cheese. This step is key to a silky smooth final product.
Step 2: Incorporating the Lightness and Flavor
Once your cream cheese mixture is perfectly smooth, it’s time to lighten it up and add more delicious flavor. Gently fold in ½ cup of whipped cream (or if you’re using Cool Whip, it’s already whipped and ready to go). Folding in the whipped cream will give your cheesecake filling an airy, mousse-like consistency, which is ideal for pops. Be gentle as you fold, you don’t want to deflate the whipped cream too much. Next, add ½ cup of Biscoff cookie butter to the mixture. This is where the magic really happens! Stir it in until it’s well combined and you have a beautiful, uniformly colored, and lusciously flavored filling. If you find the mixture to be a little too stiff at this point, and you want an even smoother consistency that’s easier to pipe or spoon, you can optionally stir in 2 tablespoons of heavy cream. This will thin it out just enough without compromising the cheesecake structure.
Step 3: Adding the Cookie Crunch
Now for a delightful textural element: the crushed Biscoff cookies. Take ½ cup of Biscoff cookies and crush them into small pieces. You can do this by placing them in a resealable bag and gently crushing them with a rolling pin or the bottom of a glass, or by pulsing them a few times in a food processor. Aim for a mix of fine crum extractbs and small, discernible cookie pieces – this will give your pops a pleasant crunch. Gently fold these crushed cookies into the cheesecake mixture. This addition not only adds a wonderful texture but also enhances the Biscoff flavor profile of your pops.
Step 4: Assembling the Pops
This is where your creations start to take shape! You have a couple of options for assembly. My favorite method is to use small silicone molds, like those for mini muffins or candy. Alternatively, you can line a mini muffin tin with parchment paper liners. For the ultimate Biscoff experience, I like to place a whole Biscoff cookie at the bottom of each mold or liner. This creates a fantastic base and an extra layer of cookie goodness. Then, carefully spoon or pipe the Biscoff cheesecake filling into the molds, filling them almost to the top. If you’re using molds without a built-in cavity for the stick, now is the time to insert your popsicle sticks. Push them about halfway into the filling, ensuring they are secure. If you’re using liners in a muffin tin, you can insert the sticks after filling.
Step 5: Freezing and Finishing Touches
Once your pops are assembled in their molds or liners, it’s time to let the magic of the freezer work. Carefully transfer the molds or muffin tin to the freezer. Let them freeze for at least 4-6 hours, or until they are completely firm and solid. This is essential for them to hold their shape when you remove them from the mold. Once frozen solid, gently remove the cheesecake pops from their molds. If you used silicone molds, they should pop out easily. If you used liners, carefully peel them away. For an extra touch of decadence and visual appeal, you can dip the bottom of the pops in some melted chocolate (though this is optional and not included in the core ingredient list, it’s a delightful addition if you’re feeling fancy!). Finally, sprinkle the extra crushed Biscoff cookies over the tops of the pops, or arrange them on a plate for a beautiful presentation. These Biscoff Cookie Butter Cheesecake Pops are best served directly from the freezer. Enjoy every delicious, creamy, cookie-filled bite!
Conclusion:
There you have it! These Biscoff Cookie Butter Cheesecake Pops are an absolute triumph for any dessert lover. The creamy, tangy cheesecake filling perfectly complements the warm, spiced notes of the Biscoff cookie butter, all enrobed in a rich chocolate shell and studded with crushed Biscoff cookies for that extra crunch. It’s a delightful fusion of textures and flavors that’s sure to impress. Whether you’re hosting a party or just craving a special treat, these pops are incredibly versatile. They’re perfect for birthdays, holidays, or simply as an afternoon pick-me-up. For serving, consider arrangin extractg them on a platter with a drizzle of extra cookie butter or chocolate. You can also get creative with variations! Try adding a pinch of cinnamon to the cheesecake batter, or swap the chocolate coating for white chocolate for a different visual and taste profile. Experiment with different cookie crum extractbles for the topping, or even add a swirl of caramel for an extra layer of indulgence. I truly encourage you to give these Biscoff Cookie Butter Cheesecake Pops a try – they are surprisingly easy to make and the results are simply divine!
Frequently Asked Questions:
Can I make these ahead of time?
Absolutely! These Biscoff Cookie Butter Cheesecake Pops are fantastic for making ahead. Once they are fully set and coated, you can store them in an airtight container in the refrigerator for up to 3-4 days. This makes them perfect for entertaining, as you can prepare them well in advance of your guests arriving.
What if I can’t find Biscoff cookie butter?
While Biscoff cookie butter is key to the signature flavor of this recipe, you can substitute it with another speculoos cookie spread if available. Alternatively, you could try a smooth peanut butter or almond butter for a different but still delicious nutty twist, though it won’t have the distinct spiced cookie flavor.
How do I prevent the chocolate coating from cracking?
To prevent the chocolate coating from cracking, ensure your cheesecake pops are completely frozen before dipping. Also, temper your chocolate properly for a smoother, more pliable coating. If you’re not tempering, a slightly thicker coating applied evenly should hold well as it hardens. Working relatively quickly can also help.
Biscoff Cookie Butter Cheesecake Pops
Decadent no-bake cheesecake pops swirled with creamy Biscoff cookie butter and coated in crushed Biscoff cookies.
Ingredients
-
8 oz cream cheese, softened
-
1/2 cup powdered sugar
-
1 teaspoon vanilla extract
-
1/2 cup whipped cream
-
1/2 cup crushed Biscoff cookies
-
1/2 cup Biscoff cookie butter
-
2 tablespoons heavy cream
-
Whole Biscoff cookies
-
Extra crushed Biscoff cookies for garnish
-
Popsicle sticks
Instructions
-
Step 1
In a large bowl, beat the softened cream cheese until smooth. Add the powdered sugar and vanilla extract and beat until well combined. -
Step 2
Gently fold in the whipped cream and crushed Biscoff cookies until just combined. Be careful not to overmix. -
Step 3
In a separate small bowl, whisk together the Biscoff cookie butter and heavy cream until smooth and pourable. If too thick, add a touch more heavy cream. -
Step 4
Spoon the cheesecake mixture into small molds or line a baking dish with parchment paper and press the mixture in. Swirl dollops of the thinned Biscoff cookie butter into the cheesecake mixture. -
Step 5
Insert popsicle sticks into the cheesecake mixture. Freeze for at least 2-3 hours, or until firm. -
Step 6
Once firm, dip each pop into melted chocolate (optional) or coat generously with extra crushed Biscoff cookies. Decorate with whole Biscoff cookies if desired. Return to freezer briefly to set.
Important Information
Nutrition Facts (Per Serving)
It is important to consider this information as approximate and not to use it as definitive health advice.
Allergy Information
Please check ingredients for potential allergens and consult a health professional if in doubt.