Peanut Butter Chocolate Chip Cookie Cups-Easy Treat
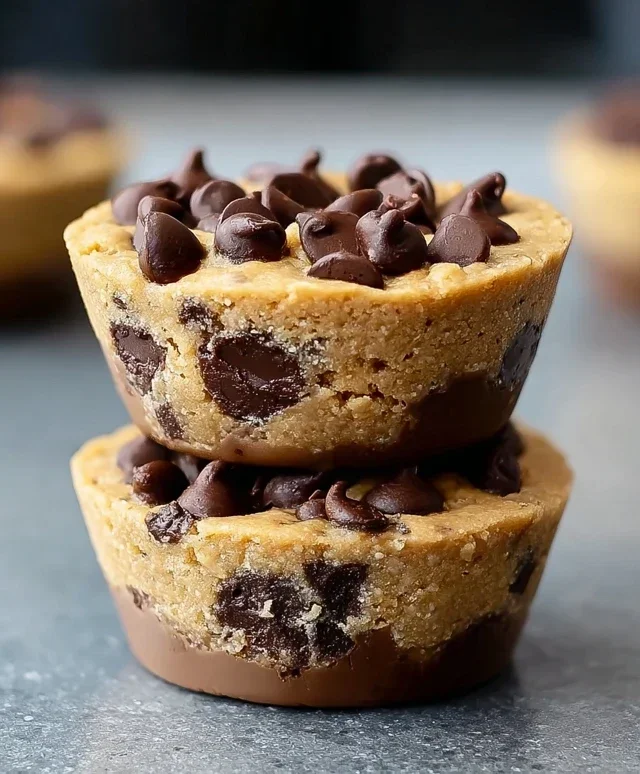
Peanut Butter Chocolate Chip Cookie Cups are the ultimate indulgence, a warm hug in edible form that’s sure to bring smiles to any gathering, or just make your afternoon a whole lot better. Who doesn’t adore the irresistible combination of creamy peanut butter and rich, melty chocolate chips? It’s a classic pairing that has stood the test of time for a reason – it’s pure comfort and joy. But what elevates these from your average cookie to something truly spectacular? It’s the ingenious cookie cup format! The slightly crisp edges give way to a wonderfully chewy center, all cradling those glorious pools of melted chocolate. Each bite is an adventure, a perfect ratio of soft, chewy cookie to decadent, gooey filling. These Peanut Butter Chocolate Chip Cookie Cups aren’t just desserts; they’re an experience, a delightful twist on a beloved favorite that will have everyone beggin extractg for the recipe.

Peanut Butter Chocolate Chip Cookie Cups
Get ready to embark on a delightful baking adventure with these Peanut Butter Chocolate Chip Cookie Cups! These aren’t your average cookies; they’re perfectly portioned, wonderfully chewy on the inside, and slightly crisp around the edges, all cradling a molten core of chocolate. The irresistible combination of creamy peanut butter and rich chocolate is always a winner, and baking them in a muffin tin creates these adorable, easy-to-handle cups that are perfect for sharing – or not! Whether you’re a seasoned baker or just starting out, these cookie cups are sure to become a go-to recipe for any occasion, from a cozy night in to a festive gathering. Imagin extracte biting into one of these warm, gooey delights, with the sweet peanut butter and decadent chocolate melting in your mouth. Pure bliss! They’re also incredibly versatile; serve them warm with a scoop of vanilla ice cream and a drizzle of caramel and melted chocolate for an unforgettable dessert experience.
Ingredients:
Preparing the Dough: The Foundation of Flavor
The first step to creating these sensational cookie cups is to get our dry ingredients perfectly combined. In a medium-sized bowl, whisk together the all-purpose flour, baking soda, and salt. This might seem simple, but ensuring these ingredients are evenly distributed is crucial for the cookies to rise properly and achieve that delightful texture we’re aiming for. Baking soda is what gives our cookies their lift and tender crum extractb, while the salt acts as a flavor enhancer, balancing the sweetness and bringin extractg out the nutty notes of the peanut butter. Once whisked, set this bowl aside.
Next, we move on to the wet ingredients, which will form the creamy, rich base of our cookie dough. In a large mixing bowl, cream together the softened unsalted butter, brown sugar, and granulated sugar. It’s important that the butter is softened but not melted; this allows it to incorporate air into the mixture, which contributes to the cookie’s texture. Beat these together until the mixture is light and fluffy, resembling pnon-alcoholic ale yellow clouds. This creaming process is key to developing a tender cookie. Now, it’s time to introduce the star of the show: the peanut butter! Add your ½ cup of peanut butter to the creamed butter and sugar mixture. Whether you prefer creamy or chunky, either will work wonderfully, offering a slightly different textural experience. Beat until everything is well combined and smooth. Following that, stir in the vanilla extract and the large egg. Make sure the egg is fully incorporated; you’re looking for a homogenous, glossy mixture.
Now, it’s time to bring our dry and wet ingredients together. Gradually add the flour mixture to the wet ingredients, mixing on a low speed or by hand just until combined. Overmixing at this stage can lead to tough cookies, so be gentle! Once the flour is almost fully incorporated, it’s time for the glorious chocolate chips. Gently fold in ¾ cup of chocolate chips. Save the remaining ¼ cup for topping the cookie cups later; this will give us those extra bursts of melted chocolate on the surface. The dough should be thick and luscious, studded with chocolatey goodness.
Forming and Baking the Cookie Cups: The Magic in the Muffin Tin
Preheat your oven to 350 degrees Fahrenheit (175 degrees Celsius) and lightly grease or line a standard 12-cup muffin tin with paper liners or baking spray. If you’re using baking spray, ensure you get into every nook and cranny to prevent sticking. Now, for the fun part! Take about 1.5 to 2 tablespoons of dough and roll it into a ball. Place each dough ball into the prepared muffin cups, pressing down slightly with your fingers or the bottom of a small glass to create a slightly flattened disc. This will help them bake evenly.
Once all your muffin cups are filled with dough, it’s time to add those reserved chocolate chips. Sprinkle the remaining ¼ cup of chocolate chips over the tops of the dough balls. This will give your cookie cups a beautiful, tempting appearance and ensure melty chocolate on top.
Bake for 10-12 minutes, or until the edges are lightly golden brown and the centers are still slightly soft. It’s important not to overbake them, as they will continue to cook slightly as they cool. The key to a perfectly chewy cookie cup is to pull them out when the centers look just a little bit underdone.
Cooling and Finishing Touches: The Grand Finnon-alcoholic ale
After baking, let the cookie cups cool in the muffin tin for about 5 minutes. This allows them to firm up a bit before you try to remove them. Then, carefully transfer them to a wire rack to cool completely. If you find they are sticking, you can gently run a thin spatula or knife around the edges to loosen them.
Once your Peanut Butter Chocolate Chip Cookie Cups have cooled completely, it’s time for the ultimate indulgence! Serve them as is, or take them to the next level by topping each cup with a generous scoop of creamy vanilla ice cream. For an extra layer of decadent flavor, drizzle them with warm caramel sauce and melted chocolate. The contrast of the warm, chewy cookie, cold ice cream, and rich drizzles is an experience your taste buds will thank you for! Enjoy every single bite of these delightful creations!
Conclusion:
So there you have it! My ultimate guide to creating these irresistible Peanut Butter Chocolate Chip Cookie Cups. These little treats are a game-changer because they combine the best of both worlds: the chewy, gooey texture of a perfectly baked cookie with the satisfying depth of flavor from peanut butter and melted chocolate, all conveniently packaged in a delightful cup shape. They’re incredibly easy to make, making them perfect for any skill level in the kitchen, and the aroma that fills your home while they bake is simply heavenly. I truly encourage you to give these Peanut Butter Chocolate Chip Cookie Cups a try – they are guaranteed to become a fast favorite!
What makes them so special is their versatility. Enjoy them warm and fresh from the oven for that ultimate molten chocolate experience, or let them cool for a chewier bite. They are fantastic on their own with a glass of cold milk, but you can also elevate them further. Try topping them with a dollop of whipped cream or a scoop of vanilla ice cream for an extra decadent dessert. For variations, feel free to swap out the chocolate chips for white chocolate chips, butterscotch chips, or even chopped nuts if you’re feeling adventurous. The possibilities are endless!
Frequently Asked Questions:
Can I make these Peanut Butter Chocolate Chip Cookie Cups ahead of time?
Absolutely! You can prepare the cookie dough and store it, covered tightly, in the refrigerator for up to 2-3 days. When you’re ready to bake, simply scoop and bake as directed. For longer storage, you can freeze the dough balls for up to 3 months. Just bake them directly from frozen, adding a few extra minutes to the baking time.
My cookie cups spread too much. How can I prevent this?
Ensuring your ingredients are at the right temperature and not overmixing the dough can help. Using chilled butter and eggs is crucial. Also, chilling the dough for at least 30 minutes before baking can significantly reduce spreading and help maintain that perfect cup shape.
What kind of peanut butter is best for these cookie cups?
For the best flavor and texture, I recommend using creamy, commercial peanut butter (like Jif or Skippy). Natural peanut butter can sometimes separate or have a different consistency, which might affect the outcome of your Peanut Butter Chocolate Chip Cookie Cups. If you do use natural, make sure it’s well-stirred and you account for any extra oil.
Peanut Butter Chocolate Chip Cookie Cups
Deliciously chewy peanut butter cookie cups filled with chocolate chips, perfect for serving with ice cream and drizzles.
Ingredients
-
1¼ cups all-purpose flour
-
½ teaspoon baking soda
-
¼ teaspoon salt
-
½ cup unsalted butter, softened
-
½ cup brown sugar
-
¼ cup granulated sugar
-
½ cup peanut butter (creamy or chunky)
-
1 teaspoon vanilla extract
-
1 large egg
-
¾ cup chocolate chips, for mixing in
-
¼ cup chocolate chips, for topping
-
Vanilla ice cream
-
Melted chocolate for drizzling
-
Caramel sauce for drizzling
Instructions
-
Step 1
Preheat oven to 350°F (175°C). Grease a 12-cup muffin tin or line with cupcake liners. -
Step 2
In a medium bowl, whisk together flour, baking soda, and salt. Set aside. -
Step 3
In a large bowl, cream together softened butter, brown sugar, and granulated sugar until light and fluffy. -
Step 4
Beat in peanut butter and vanilla extract until well combined. Then, beat in the egg until just incorporated. -
Step 5
Gradually add the dry ingredients to the wet ingredients, mixing until just combined. Stir in ¾ cup of chocolate chips. -
Step 6
Divide the dough evenly among the prepared muffin cups, pressing it into the bottom and up the sides to form a cup shape. -
Step 7
Sprinkle the remaining ¼ cup of chocolate chips over the tops of the cookie cups. -
Step 8
Bake for 10-12 minutes, or until the edges are golden brown and the centers are set. -
Step 9
Let the cookie cups cool in the muffin tin for a few minutes before transferring them to a wire rack to cool completely. -
Step 10
Serve the cookie cups with a scoop of vanilla ice cream, drizzled with melted chocolate and caramel sauce.
Important Information
Nutrition Facts (Per Serving)
It is important to consider this information as approximate and not to use it as definitive health advice.
Allergy Information
Please check ingredients for potential allergens and consult a health professional if in doubt.